
for Jaime
Honest, I've not lost the plot, this blog message is for Jaime, hope these help.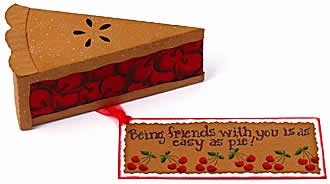
Step by step to make birthday cake
1. Trace the cake shape onto card stock. Score all the fold lines. For the curved edges, be sure to connect all the short score lines. Trim out along the outer edge
2. Stamp curvy texture in a very light color to simulate frosting texture on the top and ends of the cake.
3. Stamp "Happy Birthday" onto the box top.
4. Stamp and color the curlicue edge along the curved edge of the top of the cake.
5. Stamp the rose trio near the pointed end of the top of the cake.
6. Stamp frosting stars on each of the half-circle edge shapes. Color as desired
7. Mask and stamp stucco texture along the two rectangular sides to create the look of cake layers, or use the edge of a dry kitchen sponge to stamp the cake layer texture
8. To add a candle to the cake box, stamp two of the candles onto card stock, color and cut out. Trim so that there is a small bit of extra paper at the bottom of each candle (about 1/2 square inch). Glue the two pieces back-to-back, leaving the extra tabs at the bottom unglued.
9. To attach the candle, cut a slot in the top of the cake just the width of the candle. Fold out the two tabs at the bottom of the candle. Slide the candle through the slot from the inside, and glue the tabs in place to the underside of the top of the cake.
10. Once the cake box is stamped and colored, fold up the straight sides along the score lines. Glue the tab at the pointed end under first. Gently curve the two end pieces, overlap and glue in place so the end follows the curved edge of the bottom. Put a little glue on each of the lower half-circle edge pieces (glue the blank side that is facing up) and fold these up to secure the cake bottom to the end.
11. Fold under the long tab and bend the upper half-circle shapes down.
12. Close the cake and tuck the long tab to the inside.
13. To build a complete cake, make six identical cake pieces.
14. If desired, decorate the cake box with pressed flowers, bits of ribbon and lace, small silk flowers, die-cut paper, etc.
15. To construct a three-tier wedding cake, make six large and six small cake boxes. Decorate as desired. On the top of each box section, decorate only along the outer curved edge. The stacking layers will cover most of the top surface.
16. For the small round cake top, cut off an oatmeal box (18 oz. size) two inches up from the bottom. Cut a piece of card stock 2" x 14" to cover the sides. Use two pieces of 2" x 7" if needed.
17. Trace the lid two times onto card stock, cut one piece slightly smaller than the traced line. Glue in place to cover the printing on the lid. On the other piece, add half-circle loops around the edge (like on the cake boxes). Score along the traced line and trim around the half circle shapes. Place this piece over the bottom and fold the half circle shapes down over the edge. Glue in place. The cake top can be made a little stiffer by adding a circle of foam board or corrugated cardboard between the oatmeal box bottom and the paper circle.
18. Decorate this end of the box as the top of the cake. Add dried or silk flowers or even a little bride and groom figurine.
OK, intended to have another pic on here of the birthday cake, but blogger is not playing today, so I'll try to upload it later for you.
These instructions are from Carol Duvalls website.

1 comment:
that cake is really cool roz roz -button ups are a button that have a sticky bit at back and come pre-threaded with cotton so looks like youve sewn them on the page-they are made by eksuccess
Post a Comment